What are the best jewelry laser welder settings for gold, silver, and platinum repairs?
Start with the correct spot size for the repair, select your machine's recommended material preset, and adjust pulse energy and pulse width until the joint achieves clean, consistent fusion. Use frequency to control how quickly pulses repeat and prevent unnecessary heat buildup.
Four settings determine how a jewelry laser welder delivers energy to the metal: power, pulse width, frequency, and spot size. Each affects the weld differently.
Setting | What It Controls | When to Adjust It |
|---|---|---|
Power / Pulse Energy | How much energy is delivered to the weld | When fusion is weak or melting is excessive |
Pulse Width (ms) | How long each laser pulse delivers energy | When weld-pool behavior or heat delivery needs adjustment |
Frequency (Hz) | How quickly laser pulses repeat | When repeated welding causes heat buildup |
Spot Size (mm) | How concentrated the laser energy becomes | When the weld area is too narrow or too wide |
The correct settings depend on the metal alloy, joint thickness, repair type, and machine configuration.
A delicate gold chain, a worn prong, and a thick platinum ring cannot use the same welding program.
For jewelers using a jewelry laser welder, understanding these four controls makes it easier to select starting parameters, identify welding problems, and save repeatable settings for future repairs.
1. What Do Power, Pulse Width, Frequency, and Spot Size Control?
The four parameters work together, but each serves a different purpose.
Understanding their individual effects helps you adjust a weld without changing several settings at once.
Power and Pulse Energy: Control Melting
Power and pulse energy are closely related, but they are not interchangeable.
Pulse energy, measured in joules (J), describes the total laser energy delivered during one pulse.
Higher pulse energy can increase the amount of metal melted and may improve penetration when the joint is properly prepared.
However, excessive energy can produce craters, spatter, or burn-through.
Some jewelry laser welders display pulse energy directly in joules. Others use voltage, power percentage, or proprietary settings to control laser output.
These displayed values do not necessarily represent the same physical quantity.
For example, voltage on a traditional flashlamp-pumped YAG machine can influence laser-pulse output. It does not mean an electrical welding current passes through the jewelry.
Similarly, a machine's rated average power in watts does not tell you how much energy is delivered during each individual pulse.
How to adjust it: If a weld shows insufficient fusion, confirm the focus and joint condition before gradually increasing energy within the machine's recommended range.
If the weld forms a crater or melts through the metal, reduce excessive energy delivery and reassess the spot size.
Pulse Width: Control Energy Delivery Time
Pulse width, also called pulse duration, is measured in milliseconds (ms).
It describes how long the laser delivers energy during each pulse.
Changing pulse width affects how the weld pool forms, how long the metal remains molten, and how heat spreads around the joint.
For a thin prong or chain link, an unsuitable pulse can melt too much material before the operator has established a stable joint.
For a thicker ring shank, the energy-delivery profile may need adjustment to achieve sufficient penetration.
However, a longer pulse does not automatically produce a deeper or stronger weld.
The result also depends on pulse energy, peak power, spot diameter, and the shape of the laser pulse.
For example, increasing pulse duration while maintaining peak power can increase the total delivered energy. If total pulse energy remains fixed, spreading that energy over a longer duration changes the power profile instead.
How to adjust it: Use the machine's recommended pulse-width range for the material and repair. Change the duration gradually when testing shows that the molten pool or penetration needs adjustment.
Avoid treating pulse width as a substitute for correct focus or joint preparation.
Frequency: Control Pulse Repetition
Frequency is measured in hertz (Hz), meaning the number of laser pulses that can be delivered per second.
A higher frequency allows pulses to repeat more rapidly during continuous or repeated welding.
This can help operators produce overlapping weld spots efficiently.
However, placing many pulses close together can increase heat accumulation, especially on delicate jewelry.
For example, a series of closely spaced pulses may overheat a thin chain link even when each individual pulse produces an acceptable weld.
Frequency should therefore match the welding pace and the amount of cooling time the workpiece requires.
How to adjust it: If individual weld spots look good but the surrounding metal begins overheating during repeated welding, reduce the pulse repetition rate, space the welds farther apart, or allow more cooling time.
Increasing frequency is not a reliable way to correct insufficient penetration from a single pulse.
Spot Size: Control Energy Concentration
Spot size describes the diameter of the focused laser beam at the workpiece.
It is one of the most useful settings for jewelry repair because the size of the joint can change significantly between applications.
At the same delivered pulse energy, a smaller spot concentrates energy into a smaller area.
For a comparable beam profile, reducing the spot diameter by half increases the average energy delivered per unit area by approximately four times.
This concentration can help create narrow welds, but excessive energy density may also produce craters or burn-through.
A larger spot distributes energy over a broader area. It can be useful for smoothing filler metal or treating wider sections, but penetration may decrease if other settings remain unchanged.
How to adjust it: Choose a spot that matches the joint size and intended weld area.
For fine jewelry, precise positioning matters as much as the minimum spot diameter.
A professional laser welder for jewelry should allow controlled spot adjustment together with suitable pulse-energy and pulse-width settings.

2. Which Settings Are Best for Common Jewelry Repairs?
Jewelry laser welding settings should begin with the repair rather than the metal name alone.
A thin 14K gold chain may require much less energy than a thick 14K ring, even though both use the same alloy family.
Fine Chains and Jump Rings
Fine chains contain very little metal, so excessive energy can quickly damage the link.
For many small chain and jump-ring repairs, a spot around 0.2–0.3 mm is a practical size to evaluate when the equipment supports it.
Begin with the machine's recommended low-energy program for the material.
Align the joint carefully and avoid firing repeated pulses onto the same small area without checking the result.
If the metal begins to crater or melt excessively, investigate pulse energy and spot concentration before continuing.
The goal is to create enough fusion to close the joint while preserving the shape and movement of the surrounding links.
Prong Retipping and Bezel Repair
Prong repairs require accurate positioning and controlled metal buildup.
The operator may need to attach compatible filler wire to a worn tip or repair a narrow crack near the setting.
A spot around 0.2–0.4 mm can be a useful starting range to test, depending on the actual prong dimensions.
The selected pulse energy must be sufficient to fuse the filler and original metal without producing excessive melting.
For a worn tip, several controlled weld spots may be preferable to one aggressive pulse.
However, repeated welding can still accumulate heat.
When working near gemstones, evaluate the stone's condition and heat sensitivity before repair. A localized laser weld does not guarantee that every mounted gemstone is safe.
Ring Sizing and Shank Repair
Ring-shank repairs generally involve more metal than fine chains or prongs.
For many ordinary ring joints, a spot around 0.4–0.8 mm is a useful range to evaluate.
The appropriate pulse settings depend on the shank thickness, joint preparation, alloy, and required fusion depth.
During the initial joint repair, the priority is adequate penetration and a sound connection between the two metal surfaces.
After the structural weld has been established, a larger spot may help blend added filler metal.
For example, the operator may use a narrower spot to establish fusion and then broaden the spot for smoothing.
However, a wider surface weld cannot compensate for incomplete fusion underneath.
The strongest-looking weld is not necessarily the strongest joint.
For ring-sizing repairs, inspect the actual fusion before completing polishing and finishing.
How Do Gold, Silver, and Platinum Differ?
Material properties affect how these settings behave.
Gold: Karatage and alloy composition matter. Yellow, white, and rose gold may need different pulse settings, and certain white-gold alloys can be more susceptible to cracking.
Silver: High reflectivity and rapid heat conduction can make weld-pool formation more challenging. Surface preparation and suitable energy delivery are important.
Platinum: Its high melting temperature means some repairs need greater fusion energy, particularly on thicker sections. However, fine platinum prongs still require controlled localized welding.
There is no universal joule setting for all gold, silver, or platinum repairs.
The most reliable approach is to test the combination of metal, thickness, and joint geometry on the actual jewelry laser welding machine before working on valuable jewelry.
3. How Do You Fix Common Laser Welding Problems?
When a weld fails, identify the defect before changing the settings.
Increasing power will not solve every problem. In some cases, it can make the damage worse.
Welding Problem | Possible Cause | First Adjustment or Check |
|---|---|---|
Weak or shallow fusion | Incorrect focus, insufficient energy, poor fit-up | Confirm focus and joint, then adjust energy |
Burn-through or craters | Excessive energy concentration | Reduce energy; reassess spot size |
Spatter or rough weld | Unstable melting, excessive energy, contamination | Check surface condition and pulse settings |
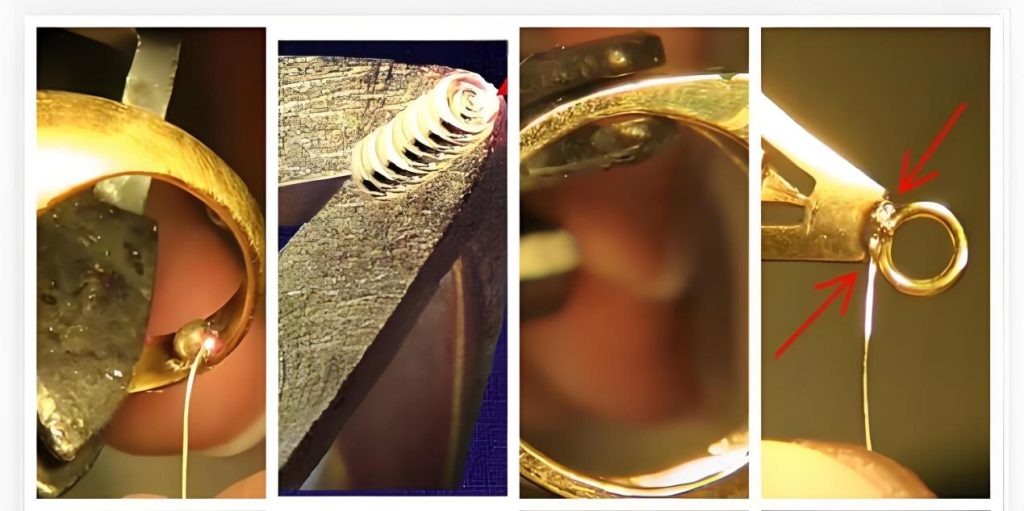
Porosity or black spots | Oil, old solder, unsuitable filler, shielding problems | Clean and inspect material and gas delivery |
Cracking | Alloy sensitivity, residual stress, incompatible filler | Check alloy and joint condition before rewelding |
Excessive heat buildup | Repeated overlapping pulses | Reduce repetition or allow cooling |
What Should You Adjust First?
If the weld is too shallow, confirm focus and joint alignment. If these are correct, increase the delivered energy gradually or revise the pulse profile according to the machine's recommendations.
If the weld burns through, reduce excessive energy concentration. A larger spot may help in some situations, but only if it remains suitable for the joint geometry.
If the weld produces spatter, check for contamination, old solder, and excessive local melting. The problem may involve both laser settings and the material itself.
If the weld develops porosity, inspect the joint for oil, polishing compound, unsuitable filler, and previous repair materials. Confirm shielding effectiveness where required.
If the weld cracks, do not assume that reducing power will solve the problem. Examine the alloy, filler compatibility, joint stress, and existing damage.
Some defects require the damaged material to be removed and the joint prepared again.
Changing the laser settings cannot correct every material problem.

4. How Do You Find and Save Reliable Welding Settings?
The most effective way to develop jewelry laser welding parameters is to follow a repeatable testing process.
A saved setting should represent a verified combination of machine, material, and repair—not a number copied from another manufacturer's chart.
Start With the Correct Setup
Before firing the laser, identify the alloy and inspect the repair area.
Confirm whether the task involves joining two metal surfaces, filling a crack, or rebuilding a worn component.
Clean the joint and use compatible filler wire where necessary.
Then select the closest manufacturer-recommended preset.
Confirm the focal position and choose a spot size appropriate for the joint.
Test and Adjust One Parameter at a Time
Use matching scrap before welding valuable jewelry.
Make a controlled test weld and examine the result under magnification.
Look for fusion, weld-pool shape, craters, spatter, porosity, and cracking.
If the weld needs adjustment, change one major parameter at a time.
For example, if penetration is insufficient, confirm focus and joint condition before adjusting energy.
If repeated welding overheats the surrounding area, review frequency and pulse placement rather than immediately reducing the energy of every individual pulse.
Continue until the test produces a repeatable result.
For repairs where strength matters, visible appearance alone is insufficient. Verify the joint using an appropriate inspection or test method.
Save Settings for Each Repair Type
Once the weld is reliable, record the machine model, material, joint dimensions, pulse energy or machine power setting, pulse width, frequency, spot diameter, and shielding arrangement where applicable.
Many workshops benefit from maintaining separate starting programs for fine gold chains, ring-sizing joints, prong repairs, and platinum components.
These records make it easier to repeat successful repairs without restarting the entire adjustment process.
What Should You Look for in a Jewelry Laser Welder?
For a professional repair shop, adjustable settings are more valuable when they are easy to control and repeat.
Look for a suitable pulse-energy range, pulse-width adjustment, stable spot-size control, clear microscope positioning, and the ability to save frequently used programs where available.
Also evaluate working-area access, shielding-gas compatibility, and the quality of the supplier's sample welding support.
Do not choose a machine solely because it advertises higher average power or a smaller minimum spot size.
A professional laser welder for jewelry repair should produce consistent results across the jewelry materials and joint sizes your workshop handles regularly.
Conclusion
Jewelry laser welder settings become easier to understand when each parameter has a clear purpose.
Power and pulse energy influence how much metal is melted.
Pulse width controls how that energy is delivered over time.
Frequency determines how rapidly pulses repeat and can affect heat accumulation.
Spot size controls how concentrated the laser energy becomes.
For fine chains and prongs, precise energy delivery and small weld areas are particularly important.
For ring shanks and heavier precious-metal repairs, sufficient penetration and correct joint preparation become greater priorities.
The best settings depend on the machine, metal alloy, thickness, and repair type.
Start with an appropriate preset, confirm the focus, test on matching scrap, adjust one parameter at a time, and save the proven results.
For jewelers and repair workshops, a controllable jewelry welder makes it easier to manage everything from delicate chain repairs to ring resizing and precious-metal restoration.
Our team can help you select a suitable machine configuration and discuss application-specific welding tests before you purchase equipment.